Showing posts with label Renovation. Show all posts

Wednesday, March 28, 2012

Client Project: Master Bath

I'm so incredibly grateful and amazed to be at a point where new work just keeps coming in without my having to actively seek it out.  It amazes me the route by which some projects have ended up in front of me and this is one of them.

A leaky shower pan has turned into a full on master bathroom remodel.


I'm pretty sure the limestone is being dumped in favor of a quartz which I'm all in favor of!

Friday, December 16, 2011

Client Project: Kitchen Update

Between a trip to London, another to Germany, two good size projects in a crunch to get done before Thanksgiving and everything else going on I've done nothing but think about the blog posts I'd like to write.  Hopefully some of the stuff I have to share will make up for it!

I've been so excited about this project.  The client is amazing, I adore her personally and she was so much fun to work with.  I have to give her so much credit in that even though she couldn't necessarily see my 'vision' on a couple of the components we used, she was willing to trust me and go with it.  I think that leap of faith outside of our comfort zone can be really hard for a lot of people.

It seems that the vast majority of the calls that I'm getting lately are from people facing the same issue that we dealt with here.  The kitchen is 'fine', fairly new, but already feels dated and very builder basic.

It's no secret that I want to paint everything, but living in the Mid-West this can be a very unpopular opinion.  My carpenter rolls his eyes at me, the old guys doing other work mutter under their breath, everyone has an opinion.  I try to remind people that not all wood is good wood and sometimes your best option short of tearing it out and starting over, is to paint it.  This client was resistant to the idea of painting all the cabinets at our first meeting but warmed up to it quickly (thankfully!), but even then, her parents and family were horrified at what she was about to do.

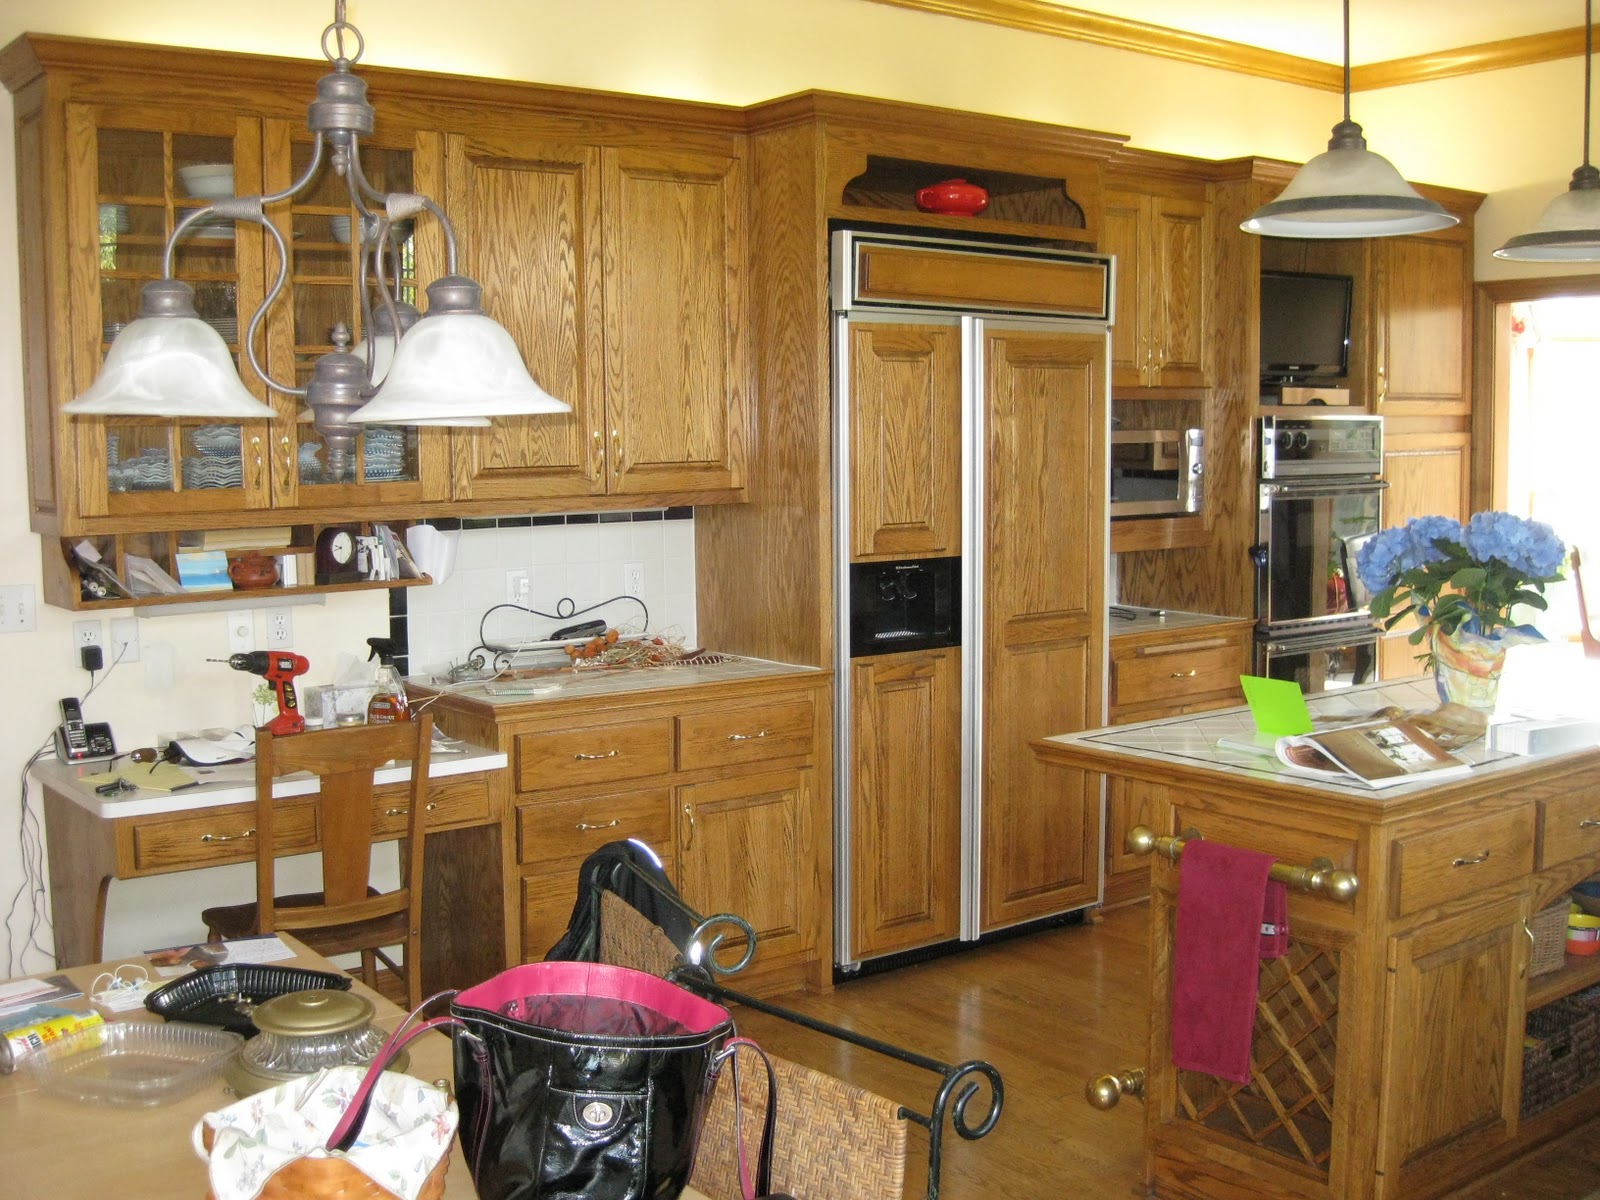
So this is what the kitchen looked like at our first meeting:


My plan included the following:

  • Miscellaneous Carpentry Items:
    • Removing the planing desk and sorter over it, replace it with a new base cabinet with full extension wood box deep drawers for baking supplies
    • Removing the wine rack and retrofitting that cabinet
    • Retrofitting the cubbie that was housing the microwave, it was sized for microwaves that are no longer available
    • Add a shelf in the TV cubbie to match the shelf over the refrigerator
  • Have the cabinets professionally painted (doors and drawer fronts were sprayed in their shop, boxes were done in place)
  • Granite countertops
  • Backsplash
  • Lighting
  • Pull in some color and pattern with new window treatments, rugs, and hopefully chair seats.
  • Replace the clear glass in the cabinet doors with a patterned glass
  • Paint and accessories
In a little over 5 weeks we have this:


There are still some items to be finished up (outlet covers, roman shade for over the sink, new table & chairs, etc) but we really are 99% done and I couldn't be happier with the results.  I think it looks amazing and best of all the client is thrilled with the results.  It makes me happy just to think about how happy she is with it all!

Wednesday, July 27, 2011

Our House

After the sale of The Bungalow and the house my husband owned when we started dating, the deal on the new property fall through due to a sticking point of repair after inspection.  It literally left us homeless. We thought it would a very temporary issue, hah, yeah right.  Ten long months of living in an extended stay hotel with the majority of our stuff in storage ensued.  I easily looked at over 150 houses, we wrote 7 offers, and I was beyond frustrated.

I was looking for a house that met our basic criteria in terms of room sizes and layout that was priced far enough under market value that I could justify the work I'd want to do before moving in.  I have to be honest, I don't think 'move in ready' will ever exist for me.  There will always be something I want to change.  Need to change to make it my own.  I mentally start remodeling and redecorating almost every building I walk into.

I looked at our current home while my husband was out of town on business.  He made the offer on the house sight unseen.  It had his big sticking points and I was confident the price was right for the work I'd want to do.  The downside? It was a short sale.

We made the offer in May.  And waited.  I continued to look at other houses.  And waited.  I bugged the bank and listing agent.  And waited.  Finally we had all the approvals we needed.  We closed on the house on August 1st of last year.

Behold the builder beige that was our house when we looked at it:


The dumpster was delivered the day of closing and we hit the ground running.

In eight short weeks we remodeled the kitchen, two of the bathrooms, installed new flooring through the entire house, new base and casing and had everything painted top to bottom (including all the stained pine woodwork that remained).  Clearly this was not a DIY project but a race to the finish to get out of the hotel!

The afters start tomorrow........

Tuesday, July 19, 2011

The Bungalow: Exterior

We all hear so often how important curb appeal is when trying to sell your house.  How's this for curb appeal?  The roof had already been replaced in this photo with grey shingles assuming that when the re-siding took place it would make sense (glad the current owners took my color recommendation on their siding selection).


From a time and cost perspective there was no way I was undertaking the siding.  The current siding was fine, just ugly.  I did try to make the exterior as appealing as possible though by painting the brick columns and metal handrail, patching the cracked concrete and cleaning up the landscaping.


The current owners have had new siding in a pretty sage green color installed along with new doors and windows.


Monday, July 18, 2011

The Bungalow: Living, Dining & First Floor Bedrooms

The two bedrooms on the First Floor were pretty basic for the age of home.  Small rooms with small closets by current standards, but cute!


Ignore the people in the photo, this was the only before picture I could find for the living room.  I loved the coved ceiling and stained glass windows.


The majority of the original items in the house that remained were in pretty decent shape overall.


There wasn't much to be done with these rooms, fresh paint, new lighting and having the floors refinished.  I tried to choose budget friendly lighting that worked with the period of the house and was pretty happy  with them overall (again not what I'd have chosen if I was staying there though).  Had I been planning to live there I don't know if I could have refrained from painting all of that wood white but it's considered an offense of epic proportions in that neighborhood.


Would you have painted the woodwork white or left it?  That built in probably would have been my only hesitation, it kills me what those things go for at my favorite architectural salvage shops.

Friday, July 15, 2011

The Bungalow: Master Bath

I loved this little bathroom with it's slightly sloped ceiling and cute little window.  I had visions of a built-in for storage under that window.


I really do love the after of this bathroom.  This is where my love affair with Benjamin Moore's Quiet Moments began.  I think the only thing I'd have done differently in this bathroom if it were my own are the vanity and shower door, and adding the custom cabinet under the window of course!


Thru-body porcelain floor tile again, builder grade vanity with a granite top, and the shower tile was leftover from a previous project.  The mirror came from Home Goods and the lighting from a local source (loved this fixture).

This bathroom was a reader DIY featured by the lovely Matters of Style girls last year! 

Thursday, July 14, 2011

The Bungalow: Master Suite

I looked at the Bungalow on the very first day I went house hunting.  I told my realtor that this house was the contender to beat when I gave her the MLS numbers for the homes I wanted to see that day.  I knew that this was the house I wanted just based on the exterior photos and description.

With two bedrooms and a full bath on the first floor and an partially finished attic with a 3/4 bath I was pretty much my idea space.  I planned for the entire 2nd floor to be a Master Suite.  The small bedroom in the back to be the closet, the large open room in the front the bedroom and the bathroom right in between the two.

You can see the stairs leading up to the attic through the open door in this picture.  The bathroom was opposite the top of those stairs and the small back bedroom adjacent.


Drywall and a lot of paint later


I went back and forth on whether or not to carpet the 2nd floor but ultimately had the existing pine flooring refinished.  The pine that was there really wasn't meant for finish flooring but my hardwood refinisher claimed that he had a lot of people in the area doing it with good results.  All the feedback I got on it was positive.  I totally would have painted that floor with some sort of pattern had this ended up being my bedroom!

Wednesday, July 13, 2011

The Bungalow: Main Bath

The state of the bathroom when I bought the house left me baffled at how a couple with small children had been living in the house.  It was dis.gust.ing.  It was the very first thing to be torn out.  What this picture doesn't show is the severely water damaged ceiling and wall right over and near the toilet.


Even though the after is a vast improvement, it doesn't excite me in anyway.  Is that terrible to admit?  All of the decisions were so budget driven.


Tuesday, July 12, 2011

The Bungalow: Kitchen

When I switched gears from thinking of the bungalow as my future home to strictly as an investment the vast majority of my finish selections changed as well.  In addition to trying to set aside my personal preferences I was also faced with the reality that for the first time in my life I had more time than money and was going to need to do whatever I could to limit my costs.

I didn't take a ton of photos during the in progress phases of a lot of these rooms so you'll have to use your imagination some.

A recap of what the kitchen looked like with it's yucky mouse poop filled cabinets.  Doing all the demo work in this kitchen was my first real DIY experience.  I had guys working in another part of the house and decided just to be done with it.

Recap of what it looked like to start


And after


The kitchen is TINY.  Like 10'x11' or something close to that.  I went really neutral and pretty bare bones on it.  Keeping my bottom line in sight as well as the price point and area didn't really leave me a ton of room.

The flooring was replaced with a thru-body porcelain tile.  I had maple cabinets with a few upgrades (solid wood boxes, glass front doors) installed.  Brand new appliances and granite countertops rounded everything out.  I know that kitchens are trending away from granite but it's still the preferred material in our area and the one that I could get the very best deal on.

I left off the cabinet hardware and backsplash intentionally, not only for cost purposes but also to allow the buyer some ability to personalize the space after the fact.

Monday, July 11, 2011

The Bungalow

A few years ago I bought what was pretty much my dream house at the time.  A cute little 1920's bungalow that needed a complete renovation, good mechanicals but the already outdated interior took a beating during the course of foreclosure.

Due to some life changing events at the time I never even ended up spending a night in the house, instead it became a race to get it renovated and sold.

Here are a few highlights of what it looked like when I closed on the house.....

Oddly enough, this bathroom was a HUGE selling point for me with this house.  It was on the 2nd floor which was mainly attic space at the time.


The lovely kitchen


Main bathroom

And a shot of that unfinished attic space


The living & dining rooms


I had pretty grand plans considering the limited amount of cash I had on hand following my divorce.  Updating the kitchen and bathrooms, refinish the main level hardwood, paint the wood floor in what would be the 2nd floor master suite (complete with a dream closet including washer and dryer).

The dumpster was delivered on the day of the close and the demo took off pretty quickly.  So quickly that when my company laid me off a few weeks later the house couldn't be lived in, rented out, or sold in it's current condition.

To give you the short version:
I let the house sit for a few months while I tried find a job before my savings ran out (because unemployment that was 25% of my take home pay was not going to pay the bills).  I eventually decided to take a personal loan from a friend, finish the work, and get the house sold.  Oh, and do this before winter set in so I wasn't stuck making the payments all the way through the winter.