Friday, September 23, 2011

Gettin' Crafty

I really am the worst DIYer ever.  I start projects with high hopes and expectations that typically come crashing to the ground while my husband looks on trying not to laugh but unable to look away.  I guess that's what I get for thinking "I don't need to pay someone else to do this, any idiot can do this."  Apparently not this idiot as indicated by the variety of things I've attempted and given up on.

I've more or less accepted this fact about myself and have resigned myself to paying people to do the things I want done.  Then came Pinterest, one of the very first things I pinned was a DIY project and at last count I have 187 pins on my DIY board.  Even if I tried to do one a month.......hahahahahhahahha.  Yeah.  Anyway. 

I've been wanting to try this this photo transfer to canvas method.  I love the wrapped canvas photos in almost all forms so this was an easy sell for me.

I won't bore you with the multi-step photos and instructions because someone else has already done them better but I'm sure the suspense is killing you.......


I used a photo I took of a prayer tree in bloom at a temple in Japan and one of a palace turned museum in Russia.  I'm not displeased with the outcome but I'll definitely distress my photos further in Picnik before doing more, these came out a little too true to the original photo for me.  I'm excited to try a few different mixed media type projects using this method as well!

A bonus picture of the map versions a good friend recently did for a wedding gift......


I wish my sewing projects were going this well.  I'm sorry, but a straight line is HARD.

Next up, is a project I'll tackle with a client for her space.  We needed a plug-in pendant light in her dining area to help define the space in a large living/dining room.  On a budget.  I can't wait to do this one!


Tuesday, September 20, 2011

Our House: The Living Room, The Sofa

Replacing the Room & Board sofa was the most important thing on my list and the one I tackled first.  After visiting a friend that has an Arhaus sofa that is super deep I was determined to find one with a similar depth.  I had a Crate & Barrel gift card burning a hole in my pocket so that was our first stop and we ordered the Domino sectional.  We looked at it in stores, we were convinced it would work well in our space (with the open floor plan and cased opening that leads into the kitchen).  Best of all, we loved the stock color so we could get it in less than a week.

The old sectional sold and was picked up the day before the delivery was scheduled for the C&B sectional.  It wasn't until the old sectional was out of the way and I really started to look at the room that I started to worry about the new sectional fitting.  Once I actually laid it out I knew it would never work.  I was able to cancel the order with 5 minutes to spare.  It was then that we decided to move the R&B sofa into the living room and see if it would work for us.  As I mentioned yesterday, not so much.

So we started over.

I dragged my husband to the nearest Arhaus location in Chicago and they had several options that would have worked for us but nothing we totally loved.

On a whim we headed to one of the larger Crate & Barrel stores in Chicago and stumbled on the Lounge Sofa. 


It had the depth we wanted and we both liked it, and we had that gift card.  And a registry completion 10% off.  This time I went home and measured first, then ordered!

It was a special order item that took every bit of the time frame quoted (and then some, boo for Crate & Barrel who is clearly not winning me over between the dining table and then the delayed delivery).  It's in place now and overall I think we're really happy with it.  If I had to rate the workmanship on it I'd probably say a 7 or 8 out of 10, maybe a 6 or 7 on overall quality.  I have some concerns about how it will wear but I'm trying not to obsess about the details!


  • A comfortable but still attractive sofa
  • Window treatments
  • Something to replace the WS sunburst mirror that is clearly too small for that space (lesson learned for me regarding living in a space a bit before buying items, same goes for the R&B sofa)
  • A proper fireplace mantel
  • Decide if I'm keeping the antler table in the room, if so what color to paint the base and to replace the glass top (scratched and chipped)
  • Side tables
  • Loveseat or a set of chairs
  • 'Entertainment' unit, I need something for the TV other than the random console table it's been sitting on since we moved in
  • Pillows, throw, and accessories 
Progress is progress!

Monday, September 19, 2011

Our House: The Living Room, Change of Plans

Our plan when we bought, renovated and moved into this house was that the living room would be the 'pretty' living room and that we'd finish the basement for our TV watching and lounging.

Of course not being able to wait, I started buying a few things for the actual living room.  We were practically starting from scratch with it so why waste any time right? RIGHT?

The first was this Williams and Sonoma Home mirror I was obsessed with:


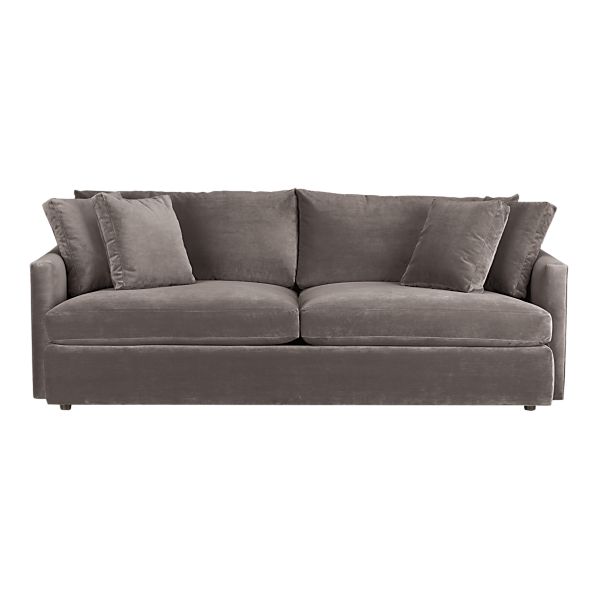
Followed by a Room & Board sofa:


And then this Surya rug:


I'd picked up this coffee table (via Craigslist) while we were still living in the hotel just because I was in love with it and had to have it, so it was planned for the living room as well:


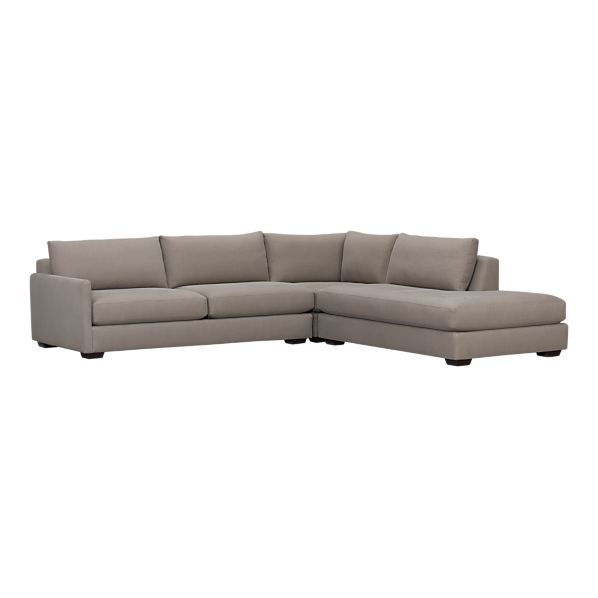
So the short term plan was to use the 1st floor living room as our comfortable TV room until we finished the basement.  The massive overstuffed sectional with reclining sections in it (belonged to my husband before we got married and he LOVED it) took up the majority of the room and we used the random tables we had already.


After a few months of living here I realized that I really loved the first floor space and being able to see my kitchen I love so much.  Not only that, but our 2nd floor space never gets used and I hated the idea of more unused space in our house.  So the plan for finishing the basement went out the window.

So the real fun starts.

I had this clear idea of what I wanted for the living room and my husband has his ideas about comfortable furniture.  He didn't want me to have to give up the things I wanted in the living room but I didn't want him to feel like he was sacrificing his comfort for my 'vision'.  (Not to mention I still feel slightly guilty for selling just about all of his furniture on Craigslist since we've been together).

We sold the sectional on Craigslist and moved the Room & Board sofa into the living room (had been up in my office since it's delivery).  I love the lines of the R&B sofa, but it's not very deep and after a few weeks of using it we were hating it for our new purposes.  Something had to be done.

So after 9 months of living here I still don't have a furnished and functional living room.  I'm keeping the Surya Rug and hopefully the metal antler table (I still love it).

So on the list are:

  • A comfortable but still attractive sofa
  • Window treatments
  • Something to replace the WS sunburst mirror that is clearly too small for that space (lesson learned for me regarding living in a space a bit before buying items, same goes for the R&B sofa)
  • A proper fireplace mantel
  • Decide if I'm keeping the antler table in the room, if so what color to paint the base and to replace the glass top (scratched and chipped)
  • Side tables
  • Loveseat or a set of chairs
  • 'Entertainment' unit, I need something for the TV other than the random console table it's been sitting on since we moved in
  • Pillows, throw, and accessories 
I'd love to have the room done by Christmas as my in-laws are coming.  My father-in-law hasn't been to the house yet and my mother-in-law saw it last Thanksgiving (I think she actually took the picture of the room above).  Not to mention I'd just really love to have it done!

Thursday, September 15, 2011

Controlling Your Renovation

Working with a repeat client on finish selections for his in-progress renovation has me all worked up over the General Contractor versus Owner relationship and the division of responsibility within that relationship.

The first time I met my client "Dan" was right after he'd closed on his house and before the renovations had started, he was relaxed and super easy to work with.  I joked about having to spend a day shopping with a fun and charming guy was definitely not a painful way to earn money.  That was about a month ago.  At our second meeting yesterday I could tell he was a ball of stress when he arrived and it didn't take long for things to unravel.  The conversation I had with him has really gotten my wheels turning, and I'm annoyed just on principal with so much of what Dan told me.  He's spending 5 hours or more a day at the renovation while his GC isn't there.  The GC is burdening him with every issue.  The latest being that the wall painter doesn't want to do the trim and doors.  I had to try not to laugh when he told me this.  Seriously? Time to find a new painter.  It's a package deal if you want the work.

I realize that I'm walking a fine line when I'm not participating in the actual construction on a project.  I have strong opinions on the way things should be done and what is acceptable by good industry standards but unless specifically asked for my view on a specific topic I try to bite my tongue unless I'm seeing something blatantly wrong or dangerous.

Most home owners will do one maybe two major renovation projects in their lifetimes so the entire process is a learning experience for them but I think there are some key points that will help make the process easier:

  • Do your homework before selecting a contractor.  Check references, talk to people, google, check BBB.  If you are opting to use a general contractor rather than attempt to general the project yourself, your GC is going to be your MVP.  Find out how much time they plan to be on site, ask what their expect your daily time commitment to be.  Make your expectations clear.
  • Have a contract and know what is in it.  Make sure you read and edit the GC's standard contract as necessary.  Get them to commit to a schedule and include it in the contract.
  • Have an idea of material price points and what you want.  Do not let your contractors drive your selections when it comes to materials.  I had suggested to Dan at our first meeting that if he decided to replace the cabinets that he consider Ikea cabinets.  In stock and inexpensive.  Or even one of the stocked lines from a local discount supplier.  Instead he's now waiting on god-awful oak cabinets the contractor pushed him into, and he's already unhappy with them before they've gone in.
  • Don't get too caught up in making everyone happy.  That isn't your job.  It's the contractor's responsibly to make you as the owner happy.  Obviously everyone wants the relationship to be a friendly one but it's still a professional relationship and as such you cannot be afraid to stand your ground.  Do not let your contractor make his problems your problems.  He (or she) is getting paid a fee to resolve the issues that come up without involving you if at all possible.  If you are spending too much time babysitting the work, speak up.  Demand that the GC be on site more.  If you think something was installed poorly, insist it be corrected.  If you selected something other than what shows up on site, require that it be replaced.  If there is construction debris everywhere remind them that clean up is done at the end of every day, not the end of the job.
  • Inspect the work before you pay for it.  Payment is the strongest motivator for action in my experience.
Bottom line is that a GC is supposed to make your life easier, that's why they're worth the fee.  If that is not happening, it needs to be addressed head on. 

Thursday, September 8, 2011

Reader Project: Amazing Painted Wall

I am totally blown away by this project.  Not only for the amazing outcome but also the tenacity to undertake it in the first place (makes me feel like a schlep).

It was love at first sight for Alice with the Paeonia wallpaper in gold from Anthropologie.  


After doing the math on just what the paper itself would cost without factoring in hanging it she had a whopping cost of $500 for just one wall!

Alice decided this was something she could paint herself and the outcome is so amazing I can't stop looking at the pictures.

The before:


Alice started with a print out of the pattern and made her stencil from a combination of file folders and cereal boxes.  Use ergonomic scissors or an exacto knife so you don't kill your hand with all the detailed cutting!

Then the pattern was traced onto the wall using the 'stencil'.  Use a pen in the same color family as your paint color!  Then get to painting!


In progress:

And the amazing final product.  For a final cost of $28.18 and about two months of on and off time Alice gets to look at this everyday!


So incredibly gorgeous!

Alice was kind enough to share her template with us, if anyone attempts this please report back!

Friday, September 2, 2011

Before & After: $7.99 Goodwill Nightstands

Eventually I'll have a bunch of posts regarding a Client Project that I've been working on all summer but I couldn't wait to share this one.  The project is a 1 bedroom rental apartment that just didn't have a cohesive feel to it.  In addition to having some limitations because it's a rental (with mostly plaster walls and one concrete wall) our budget has been super super tight so I've had to be really creative with the purchases we've made.

Once we identified that items that could remain or be repurposed elsewhere in the apartment I added the items that we needed to purchase to my constant running list.

One of the main items we needed were nightstands with storage.  We didn't have a lot of space for them considering the client has a King size bed in what is a fairly small bedroom.

I almost bought a set like this at a flea market for $50, but the client didn't get back to me quickly enough (our agreement is no non-returnable purchases that I won't be willing to keep without her approval!):


I love this Art Deco style and I do think $50 for the pair was a decent enough deal.  Obviously the narrowness of the nightstands (with the storage) would have been great.  But they got away.....

I was a little worried about finding another pair (pairs of anything are like unicorns when it comes to used furniture) until I stumbled upon these at one of my local Goodwill's for $7.99 each:


Blah 80's oak.  I loved the detail on the front of the drawers, we were 99.9% sure that they would JUST fit in the space we had to work with it and the price was right on.

A couple of coats of Rustoleum's Night Tide (and one spray painting fiasco later) we have this:


Clearly a tight fit but will provide much needed storage space and (you'll see in later pictures) they somehow manage to make the room seem larger.  The super gloss dark teal color looks great against the new wall color and works well with the bedding.  We may decide to take some Rub 'N Buff to the original pulls but haven't decided yet.

Lots of stuff coming together now and I can't wait to post the other projects we've been working on!